
- Introduction
- Platform Setting
- Login and Dashboard
- Product Request
- Request with Offline identification (in decommissioning)
- Live ID Recognition Product Request
- Request with Video ID identification
- Sign ID Recognition Product Request
- SPID Recognition Product Request
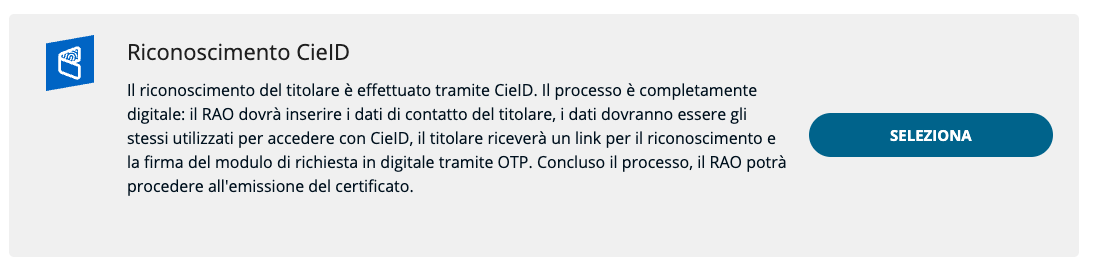
- Request with CIE identification
- Request with SelfQ identification
- Emission
- Product Management
- Product Suspension
- Product Revocation
- Encrypted enveloped resend
- Search and details of products and users
 InfoCert Partner Platform User Manual
Introduction
InfoCert Partner Platform (IPP) is the platform that enables a Reseller or Corporate Customer to activate and manage INFOCERT services for end users.In version 1.0 IPP enables the release and management of signature products: on-device and remote.
The following table lists the currently available signature products:

In addition to features related to the issue of INFOCERT services, IPP also allows you to manage the lifecycle: specifically, you can suspend or revoke services.
The suspension, which is temporary in nature, requires the entry of an end date for suspension on which the certificate suspension period will end and it will become valid again.
The annulment, which is permanent in nature and non-reversible, revokes the certificate and enters it on revocation lists (CRLs) making it no longer legally valid.
Finally, the platform has a series of management functions, such as:
- Request management: it is possible to manage service requests, edit and delete them before they are completed
- Search: it is possible to search and view the list of activated, draft or in-process services; it is also possible to perform advanced searches using filters to view products issued to a specific user, by a specific registrar, etc.
- Support: it is possible, depending on the type of business agreement, to access the support area in order to open tickets and receive assistance from Tinexta Infocert
The use of Infocert Partner Platform (IPP) is enabled for all users belonging to a given organization, coded by a client code, and they may have different entitlements and permissions. The following table lists the profiles:

Technical prerequisites
Access to the platform requires:
- A PC running Windows 10+ or MAC OS from 11.5
- Internet connection
- Credentials provided by Tinexta InfoCert or the Master RAO.
Browser supported:

For the RAO activities to identify and issue signature products, it is necessary to:
- Have a qualified signature certificate (on-device or remote) for signing the recognition report;
- Have a role-qualified signature certificate (with indication of RAO) for issuing certificates on device;
- Have installed Infocert Sign Desktop for issuing on-device signing certificates.
Platform Setting
Tinexta Infocert will take care of configuring the customized InfoCert Partner Platform for each customer, to ensure simple and fast use.
The configuration consists of:
- Units set up, based on customer requests
- Roles and functions set up to operate on the platform
- Customized product catalogue
Login and Dashboard
First Login
To access to IPP it is necessary to connect to https://eobi.infocert.it/ and click on "Login to IPP".
After clicking the Log in to IPP button, the authentication system common to all Tinexta Infocert services is presented:

Starting from July 1, 2025, IPP requires multi-factor authentication (MFA) to access. The operator must download and configure the My Infocert application and use it to log in via QR code or with credentials followed by an additional authentication factor: push notification, QR code, or OTP generated by the app.
In case of a forgotten password, it is possible to click the link: Forgot your password?.

After the log in, in case the user has configured multiple offices to work on the platform he will have to select the profile of interest:

Subsequently, he/she will have to select (by writing or selecting from the drop-down menus) the unit of interest indicating the main and secondary unit in which he wants to access:

Once the options of interest have been selected, the structure of the specific office will appear on the right-hand. Click to Enter to proceed:

This will direct the user to the Dashboard where he/she can find the latest draft requests and links to support:

The options available to operate on products and requests will appear on the left side menu:

By clicking on the Change link located under the image and the operator code, it is possible to change the profile and the working unit (switching between the profiles and the units set up for that specific customer).
From the 'Manage NCAR certificates' section, you can access the NCAR platform with the corresponding credentials to manage the certificates issued here.
User interface is in Italian.

From the Revoke Manage NCAR Certificates section, you can log in with the relevant credentials to the NCAR platform to manage the certificates issued here:

In Documents it is possible to download the forms and documents relating to the issuance requests
At the top right, the user can select the language from the dropdown menu, open a ticket by clicking the headset icon, or adjust a series of settings from the gear icon.

By clicking on the gear icon, in particular, you can configure the layout display by simply enabling or disabling the following settings:

Product Request
Within IPP, each partner can see the Product Catalog to be issued for their end-customers.
In Requests > New request section in the side menu, products are presented in the form of cards divided into macro-categories. By clicking info "i" at the top right of the cards, the user can view a preview of the micro-categories contained in each can card ( for example "Remote Signature" for the "Signature products" card):

By clicking on the Request button, the user begins the product request process.
The process can be stopped at any time by clicking on the link at the bottom left to save a draft as:


The status of the request will then change to "Draft" and will be visible in the appropriate section on the left with details of the name, operator, type of article, date of creation, visibility.
From here it is possible to continue editing the request by clicking on the pen symbol in the "Actions" section or to delete it by clicking on the trash icon:

The draft will also be visible in the "New Requests" section in the appropriate card showing "Last request to be completed".
Depending on the step the operator has reached, the request will be in a certain state and can be processed using the left-hand menu of the application.

The statuses are defined in the following table, and are consecutive: until a step has been completed, it is not possible to move on to the next one. Also, to work requests in some status, you need to have an enabled user profile.

By clicking on "New request" and then selecting "Signature products" or "Remote signature" you start the signature request process:

The product request process consists of 8 steps and initially splits according to the type of recognition of the end user that is selected among those available:
Introduction to the Recognition Process
The premises:
- In order to proceed, the Operator must be enabled for the recognition or as RAO.
- The Operator must have an active signature certificate in its name
- The Operator must have Infocert Sign Desktop installed in order to sign the report
The account can be profiled, upon customer request, with all or only some recognition methods.
In which cases is it necessary to select one type of recognition over another?
- Offline Recognition: the owner recognition is carried out de visu; after signing the paper request form it will be necessary to upload the documentation in order to proceed with the issue
- Live ID Recognition: the owner recognition is carried out de visu, the operator will have to digitally sign the recognition report, and the user will sign the request form via OTP
- Video ID Recognition: the owner recognition is carried out remotely via videocall, the operator will therefore have to send the dedicated link to the user who will sign at the end of the process the request form via OTP
- Sign ID Recognition: Identification of the applicant is carried out by digital signature, with the application form digitally signed and the RAO that verifies signature, scans the document with an antivirus tool, proceeds with data entry and uploads the digitally signed form.
- SPID Recognition : the owner recognition is carried out remotely via SPID Authentication; the operator will therefore have to send the dedicated link to the user who will sign at the end of the process the request form via OTP
The identification and contract signing process can be started in 2 ways:
- Continuing directly from the request process completed in all its steps
- From the side menu Search > To be identify, where it is possible to select the specific request or filter the list.
The filters with which you can search are:
- Order ID
- User ID
- External lookup code
- Status
- Nickname
- Activation date (from)
- Activation date (to)
- Input date
- Product type
- Tax ID code
- First name
- Surname
- Mobile phone
- Operator userID
- IUT
- Device serial number
The results are shown in the following table:

By clicking on the UserID, product details will be displayed with the link at the top left for viewing the order details:

Offline Recognition Product Request
The process of requesting and issuing a product with Offline Recognition responds to the need to give our Partners flexibility, allowing them to manage the recognition and entry of data at different times and players.
The applicant must be identified in the presence of the RAO/IR and at the same time sign the paper contract with a handwritten signature.
Subsequently, the request is entered and the product is issued in IPP in the following ways:
- Operator (no RAO): enters the request, uploads the contract and the recognition report signed by the RAO/IR (appropriately registered) also indicating personal information
- RAO/IR: enter the request, upload the contract and digitally sign the recognition report
It is therefore recommended to start the process with the application form signed by the applicant and the RAO and color copies of the applicant's ID.
Request entry
The Operator/RAO, once logged in on IPP, can start a new request in the appropriate section Requests > New request and choosing the required product.
The process of entering the data contained in the request form signed by the customer begins with the selection of the recognition method in question:

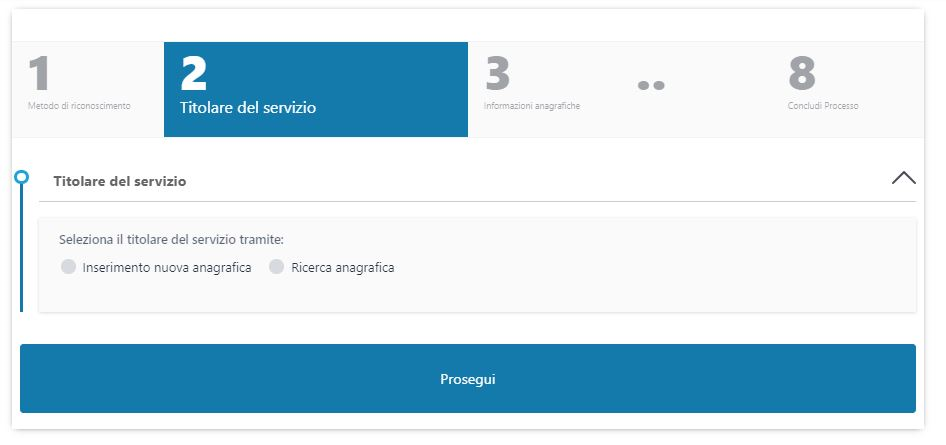
Then, it is necessary to select whether the service owner is already registered or not in the system:

In the case of a new registry entry, it can be created by clicking on the New registry entry option and then on Continue.

If the applicant's personal data are already registered in the system, it is possible to search for it by entering the tax code in the appropriate search field:

Alternatively, the operator can click on the link below Search by personal data and entering at least three search parameters:
The result will appear in tabular format, and it will be possible to select the correct one on the left.

Otherwise, in the case of a new registration, the data reported in the form must be entered.
Firstly, the country of the document and the type by choosing between Identity Card or Passport:

The next step involves entering the document into the system, uploading the images or scanning the document or taking photos to the original documents with the computer's webcam:

By clicking on the Attach adocument option, a window will appear for uploading color images of the document (two different photos for front/back or a single image that contains both elements are allowed):


To continue after the upload click on OK.
If, on the other hand, the Operator choose the option webcam, granting access permission to the camera, it will be possible to frame and photograph the document by taking a picture:

The following steps involve checking and possible editing the extracted data from the docs previously entered:


After checking the information relating to the document, personal data and residence, the Operator can continue by clicking on the appropriate button.
Then, it is necessary to enter e-mail and mobile phone (not previously used) connected to the effective owner of the service:
An identity is automatically created with the previously indicated (editable) e-mail address:

In the next step the operator selects the type of certificate to be issued from those available (in the example remote signature):

In step 6) default configurations are set, which are not modifiable (such as certificate duration).
In the case of a role certificate, it is possible to configure the membership organization and the role of the client:
The next step is related to marketing and privacy consents (the policy can be viewed by clicking on the "Privacy Policy" link) where the operator enters the flags on privacy consents indicated by the customer in the paper contract already signed.
It is important that the consent section is present as is in the applicant's signature form:

By clicking on Continue the procedure is completed:
Offline Recognition Process
By clicking on the Go to Product button from the request completion confirmation box, the RAO operator lands on the product detail page where he can proceed with the recognition process by clicking Start.
Alternatively, the operator can resume the process later from the Search > To identify side menu:

The RAO lands on the page where he proceeds to upload the signed request paper:


By clicking on Next button, the section to enter the recognizer's information will open:


At this point, the status of the product will become To issue. In order to proceed the RAO can either directly click the Go to product button or, at a later time, select the request from the side menu Search > To issue.
See chapter Issuance with steps for issuing products.
Live ID Recognition Product Request
The process of requesting service with a Live ID Recognition addresses the need to be able to recognize the customer live and have a fully digital process with one-shot signing of the request form by the customer. So unlike the Offline process (previous section), in the case of Live ID the requester must be in presence of the RAO with IPP running.
It is recommended to have the latest version of Infocert Sign Desktop running on the computer, enabled for web signing, and with an active RAO certificate to directly sign the recognition report online.
Request entry
The recognition officer or RAO, once logged in to IPP, initiates a new request in the Requests > New Request section by choosing the requested product.
Then selects the Live ID Recognition method and continue with the request:

RAO selects whether the requester is already in the system or not:

In the case of a new registry entry, it can be created by clicking on the New registry entry option and then on Continue.

If the applicant's personal data are already registered in the system, it is possible to search for it by entering the tax code in the appropriate search field:

Alternatively, the operator can click on the link below Search by personal data and enter at least three search parameters:
The result will appear in tabular format and it will be possible to select the correct one on the left:

Otherwise, in the case of a new registration, the data reported in the form must be entered.
Firstly, the country of the document and the type by choosing proper document:


The next step involves entering the document into the system, uploading the images or scanning the document or taking photos of the original documents with the computer's webcam:
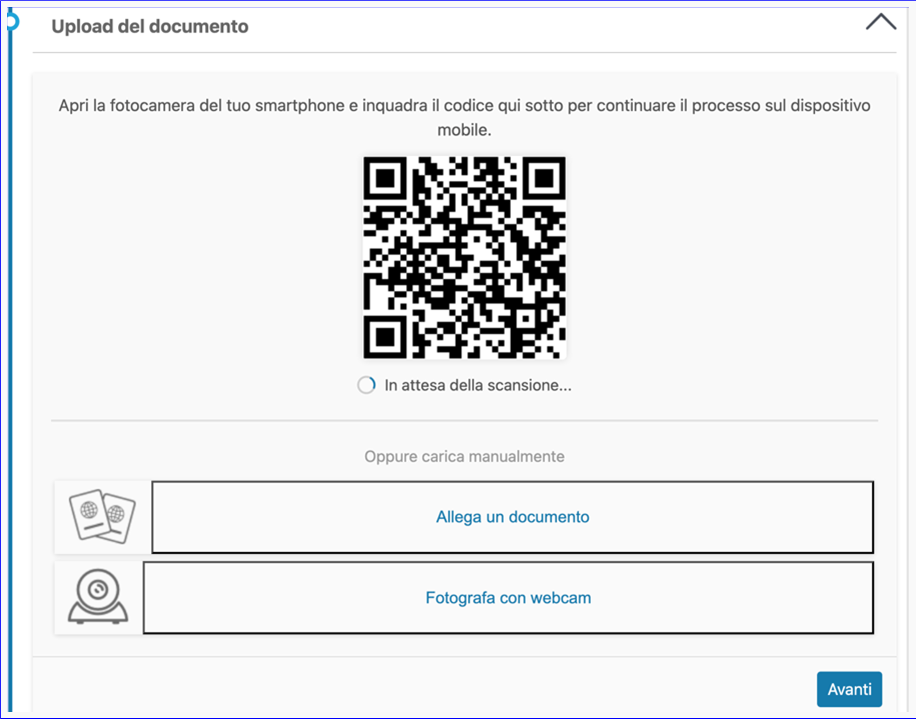
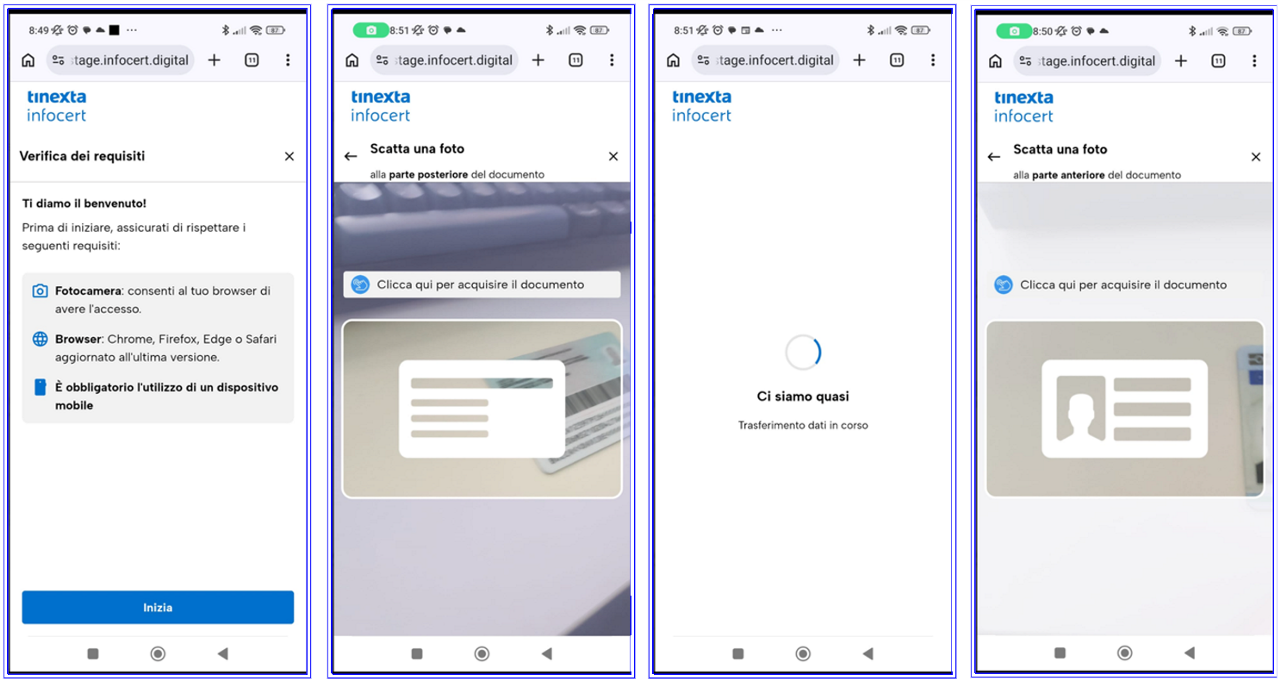
If the operator scans the QR Code with a smartphone, a guided process opens where the agent is prompted to photograph the document and collect personal and residential data.
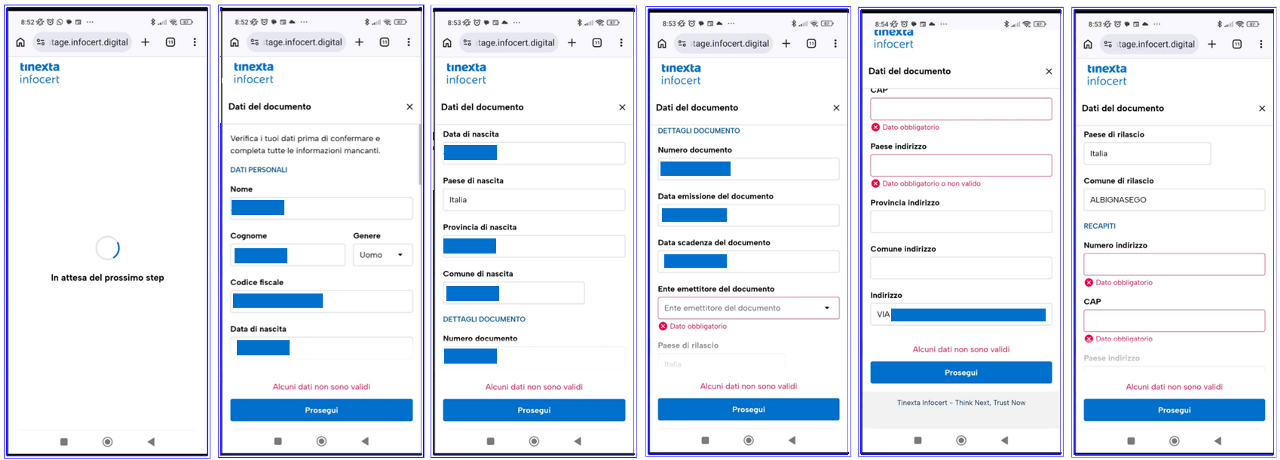
Important note: The process captures the entire address as written in the document. In the case of the CIE, the address does not only correspond to the street address but also includes the number, municipality, and province.
In this case, the operator must edit the address field and delete all the parts that will then be inserted into the appropriate fields, such as the house number, municipality, and province.
Subsequent loading modes have not changed.
By clicking on the Attach a document option, a window will appear for uploading color images of the document (two different photos for front/back or a single image that contains both elements are allowed):
To continue after the upload click on OK.
If, on the other hand, the Operator choose the option webcam, granting access permission to the camera, it will be possible to frame and photograph the document by taking a picture:

The following steps involve checking and possible editing the extracted data from the docs previously entered:


After checking the information relating to the document, personal data and residence, the Operator can continue by clicking on the appropriate button.
Then, it is necessary to enter e-mail and mobile phone (not previously used) connected to the effective owner of the service:

An identity is automatically created with the previously indicated (editable) e-mail address:

In the next step the operator selects the type of certificate to be issued from those available (in the example remote signature):

Default configurations are set, which are modifiable for particular needs (such as the duration of the certificate); it is also possible to configure the membership organization, if any, and the role of the requester (optional):

The next step is related to marketing and privacy consents (the policy can be viewed by clicking on the Privacy Policy link) where the operator enters the flags on privacy consents indicated by the customer in the paper contract already signed.
It is important that the consent section is present as is in the applicant's signature form:

By clicking on Continue the procedure is completed:

Live ID Recognition Process
By clicking on the Go to Product button from the request completion confirmation box, the RAO operator lands on the product detail page where he can proceed with the recognition process by clicking Start.
Alternatively, the operator can resume the process later from the Search > To identify side menu:

At this point the recognition officer will be able to decide whether to upload the digitally signed recognition record or to proceed by choosing the option to sign via Infocert Sign Desktop.
If RAO chooses to upload the document he/she will be able to preview it before deciding to proceed.

If, on the other hand, RAO decides to sign via Infocert Sign Desktop he/she must have the latest version of it running on the computer, enabled for web signing and with an active RAO certificate.
By clicking on Continue the following signature request po-up will open:

RAO clicks on Proceed and enters the signature PIN:

Once the RAO has signed the recognition report, the client automatically receives an email with a link to start the digital signature process of the request form:


By clicking on the appropriate link, the user starts the step-by-step wizard on the Tinexta InfoCert landing page for signing the contract:

In step 2) the customer clicks the Request Certificate button to request Tinexta InfoCert to issue two certificates:
- qualified one-shot signature certificate that the customer will use to sign the request form in the next step
- qualified signature certificate (remote or on-device) requested

At this point, the customer can preview the request form to be signed and proceed to one-shot signing by entering the OTP code received on their smartphone:


At the end of the process, the customer receives the successful confirmation email with the newly signed contract attached:

At this point, the status of the product will become To be issued : to proceed, the RAO can either directly click the Go to product button or, at a later time, select the request from the Search and Consult side menu in the To be issued section.
See the following chapter with steps for issuing products

Video ID Recognition Product Request
The application and issuance process with Video ID recognition offers the ability to identify the applicant remotely via video conference, performing the entire process digitally.
After the operator, IR or RAO enters the holder's data, the holder receives an e-mail at the given address containing the link to access the wizard to perform the recognition with a video operator; then the holder proceeds to sign the request form using an OTP code. Once the process is successfully completed, the RAO can also issue the certificate at a later time.
Request entering
The operator/Registration Officer/RAO, once logged in to IPP, initiates a new request in the appropriate section Requests > New Request choosing the requested product.
It then selects the Video ID Recognition method and continues with the request:

Selects whether the requester is already registered or not:
In case the applicant's personal data are not already present in the systems, it is possible to create it by clicking on the option Enter new master data and then on Continue.

The operator enters the data:

If, on the contrary, the applicant's personal data already exists in the systems, it is possible to search for it by clicking on the Master Data Search option:

At this point you can either enter the tax code in the search field provided or click on the link below and search by personal data, entering at least three search parameters:
The result will appear in table format in which select the correct one on the left:

Once the personal data has been entered, the contact information (e-mail and cell phone), not previously used, linked to the actual service owner must be reported:

An identity is then automatically created with the previously indicated (editable) e-mail address:
In the next step you can select the type of certificate to be issued from those available (in the example remote signature):

Default configurations are set, which are modifiable for particular needs (such as the duration of the certificate); it is also possible to configure the membership organization (if any) and the role of the requester (optional):
Next, the operator can customize the e-mail message containing the identification directions that the applicant will receive at the indicated e-mail address:

Then clicking on Continue will complete the request:
The operator clicking on Go to product will find the request status, which is indeed To be recognized by video-recognition process:

Video ID Identification Process
Customer receives an e-mail with link to complete identification process.

When user clicks the link, process starts:

On step 2) agrees about privacy data management:

On step 3) selects document type and uploads pictures of his documents and of his tax ID:


On step 4) user confirms that detected data are correct:

On steps 5) and 6) user confirms he is not a robot and takes a selfie for recognition:


At this time user can start a session with a remote operator:

Once recognized, the user can proceed with obtaining the certificates:
- one shot signing certificate to be used to sign request
- qualified signing certificate required by user

Users can now procced signing certificate request:


As proof of the completion of the process, the applicant receives a confirmation email of the contract signing (in the case of remote signing, for example):
At this point, the product status will appear as To be issued. To proceed, the operator can either click the Go to product button directly or, at a later time, select the request from the Search menu under the To be issued section.

Sign ID Recognition Product Request
If the applicant already has a digital signature (e.g., a signature certificate on an expiring device), he or she may use it as a method of recognition to request a new one.
In this case, the applicant signs the application form directly with the current digital signature, then the RAO performs the following checks:
- checks that the digital signature is valid, using Infocert Sign
- verification that the applicant's data match those in the signature certificate and entered in the form
- antivirus scanning of the signed document
Details of the steps follow. It is recommended to make sure that Infocert Sign Desktop is open and running.
First, the RAO verifies that the digital signature placed on the application form file is valid by resorting to the Verify function of Infocert Sign Desktop:


At the same time, the RAO checks that the used signature certificate's personal details and those of the applicant entered on the form match.
This is done by clicking on Open Details and then on the eye icon to view the certificate details:


Then, the RAO officer scans the document with any available antivirus.
Request entry
The Recognition Officer or RAO, once logged in to IPP, initiates a new request in the Requests > New Request section by choosing the requested product.
Then he selects the Sign ID Recognition method and continues with the request

Selects whether or not the applicant is already in the system:
In case the applicant's personal data are not already present in the systems, it is possible to create it by clicking on the option Enter new master data and then on Continue.

If, on the contrary, the applicant's personal data already exist in the systems, it is possible to search for it by clicking on the Master Data Search option:
At this point you can either enter the tax code in the search field provided or click on the link below and search by personal data, entering at least three search parameters:
The result will appear in table format in which select the correct one on the left:
Once the personal data has been entered, the contact information (e-mail and cell phone), not previously used, linked to the actual service owner must be reported:

An identity is then automatically created with the previously indicated (editable) email address:

In the next step you can select the type of certificate to be issued from those available (in the example remote signature):

Default configurations are set, which are modifiable for particular needs (such as the duration of the certificate); it is also possible to configure the membership organization (if any) and the role of the requester (optional):
The next step is related to marketing and privacy consents (the policy can be viewed by clicking on the Privacy Policy link).
It is important that the operator asks for explicit consent from the applicant regarding data processing:

Then clicking on Continue will complete the request:
Sign ID Identification Process
By clicking on the Go to Product button from the request completion confirmation screen, the Registration Officer or RAO lands on the product detail page where he/she can proceed with the quick identification process by clicking Start.
Alternatively, the operator can resume the process later from the side menu Search and Consultations > To be recognized and clicking Start.

The RAO proceeds to upload the form digitally signed by the applicant, properly verified according to the above steps:

At this point, the status of the product will become To be issued: to proceed with issuance, the RAO can either directly click the Go to Product button or, at a later time, select the request from the Search and Consult side menu under To be issued.

As proof that the process has been completed, the service owner receives an email confirming that the contract has been signed (in the example of a remote signature).
SPID Recognition Product Request
The request and issuance process with SPID identification allows the applicant to be identified remotely through a SPID login, carrying out the entire process digitally.
After the operator, IR or RAO, has entered the holder's data, the holder receives an email at the specified address containing a link to access the guided procedure for SPID identification; the holder then proceeds to sign the application form using an OTP code. Once the process is successfully completed, the RAO can issue the certificate even at a later time.
Request submission
The operator/IR/RAO, once logged into IPP, initiates a new request in the appropriate section Requests > New Request by selecting the desired product.
They then select the SPID Identification method and proceed with the request:

The IR or RAO selects whether the applicant is already present in the system or not:

If the applicant's personal data is not already present in the systems, it is possible to create it by clicking on the "Insert new personal data" option and then on "Continue":

The operator enters the personal data:

If the applicant's personal data is not already present in the system, it is possible to create it by clicking on the Inserting new personal data option and then on Continue:

The operator enters the personal data:
The result will appear in tabular format and you will be able to select the correct one on the left:

At this point, it is possible to enter the Tax Code (CF) in the designated search field or click on the link below to search by personal data, entering at least three search parameters:
The result will appear in a tabular format, and it will be possible to select the correct one on the left:
If that email is already used by another Tinexta InfoCert identity, you will be offered to use another alias based on the initial email.
The e-mail in the form is only by way of example, it does not correspond to a real e-mail address.
In the next step, you can select the type of certificate you want to issue based on those available (in the example the SPID remote signature):
It should be noted that signature products with SPID identification have a limitation of use because they cannot be used to request a SPID digital identity.
The operator will only see products with this limitation of use.
The default configurations are set and can be modified for particular needs (such as, for example, the duration of the certificate), it is also possible to configure the organization to which it belongs and the role of the applicant (optional):
By clicking on Continue the operation will be completed:
The operator by clicking on Vai to the prodotto will find the requested status, which is precisely Da riconoscere through the video-recognition process:
SPID Identification Process
The customer has received an e-mail in the indicated box containing the link to click to start the SPID recognition process:
By clicking on the link, the user lands on the Tinexta Infocert portal to start the process:

The user authenticates with SPID by clicking the Login with SPID button and selecting their Identity Provider. In this example, Tinexta InfoCert is chosen as the Identity Provider.

Following authentication with the Identity Provider, the user grants authorization for the transfer of certain attributes.

At the end of this attribute transfer, the user sees the following screen, where they can review the contractual terms.

To proceed, the user clicks the Request Certificate button.
This is followed by the contract signing step.

Below is a detail relating to the final part of the page.

By selecting the conditions indicated, the subject can go ahead and sign the contract by entering the OTP received.
Aaaa
Aaa
Aaa

Aaa

Aaa

Aaa

Aaa

Aaa

Aaa

Aaa

Aaa

Aaa

Aaa

Aaa

Aaa

Aaa

Aaa


Aaa

Aaa


Aaa

Aaa

Aaa
Aaa

Aaa

Aaa


Aaa

Aaa

Aaa

Aaa

Aaa

Aaa

Aaa

Aaa

Aaa
Aaa

Aaa


Aaa
Issuance
Once completed the customer recognition, the RAO's last activity is to issue the certificate.
RAO can directly continue the issue process right after recognition, or resuming it later in the side menu under Search to the To be Issued section, where the operator can find all the requests made that have yet to be issued:

To proceed with issuance, it is necessary to click on the UserID and then on Start enrollment

Remote signature issuance
This example shows the steps for issuing a qualified Remote Signature certificate.
Firstly, RAO must confirm the details of the certificate:

Proceeds then with certificate issuance:

Once the certificate is issued, it is necessary to establish the Passphrase that the client will use to open the file containing the activation codes.
It is possible to select the option Use the owner's tax code as Passphrase or decide to indicate a different one by selecting the second option:

By clicking on Continue this part of the process is finished and there is a confirmation of success of the operation:

At the same time, the client receives the following email containing the encrypted signature activation codes:

Device Signature issuance
If the issuance involves a signature on device, it is necessary to verify that:
- Infocert Sign Desktop is active and running
- The RAO's remote device/signature is active
- The blank device is inserted (Smart Card or Key)
The RAO can then proceed with the issuance directly after the recognition, or from the side menu under Search > To be Issued section.
Enrollment begins precisely with verification of the above-mentioned requirements:

Next, RAO displays the certificate's details being issued and confirm its data (1 operation for 2 certificates):


Once confirmed, RAO proceeds to its authentication on Infocert Sign Desktop, entering PIN and the signing OTP to perform the device configuration:

RAO will now have to enter a Passphrase that will allow the certificate owner to open the encrypted envelope with the signature activation codes, received via email.
You may choose to use the applicant's Tax Code or enter a new code of your choice:

Finally, RAO will click on continue to finish the procedure and have confirmation that the request was successful:

This is the e-mail the holder receives:

Product Management
Product status are defined in the table below and are consecutive states: until a step has been completed, it is not possible to move to the next one.
In addition, to process requests in some status, you must have an enabled user profile.

Product Suspension
From the side menu Search > Active the RAO operator can search for the certificate to be suspended, using the available filters:
- Order ID
- User ID
- External lookup code
- Status
- Nickname
- Activation date
- Input date
- Tax ID code
- First and Surname
- Mobile phone
- Operator

The RAO operator clicks on the UserID to view the product details:

Opens the General Information dropdown where information about the certificate with status indication are shown:

RAO operator then clicks on the pen icon next to the Active status and selects the new status Suspended in the drop-down menu options:

The RAO also defines the end date of suspension, attaches the contract, and reports in Notes the reasons for suspension.

Then confirm by clicking the Confirm button.
If the operation has been successful, the following pop up will appear:

The status of the product will change to Suspended:

Product Revocation
From the side menu Search and Consultations > Active the RAO operator can search for the certificate to be revoked, using the available filters:
- Order ID
- User ID
- External lookup code
- Status
- Nickname
- Activation date
- Input date
- Tax ID code
- First and Surname
- Mobile phone
- Operator

RAO operator clicks on the UserID to view the product details:

and opens the General Information dropdown where information about the certificate with status indication is given:

RAO operator then clicks on the pen icon next to the Active status and selects the new status Suspended in the drop-down menu options:
Selects the options from those available:
- Revocation type (requester): Owner, certifier, interested third party
- Publication : WARNING: the publication can be "Normal" the Certifying Body has a commitment to publish the updated revocation list within the next 24 hours, "Immediate" must occur within 1 hour.
- Motivation : Contract withdrawal, key compromised, role or function revoked, device unusable, certified data change, office procedure

In case it is expected (contract withdrawal) you must upload the contract from which you are withdrawing, enter any notes and click continue:

A message will appear that the change has been made and the status of the product will change to Revoked:

Encrypted enveloped resend
Should it be necessary to resend the email containing the encrypted envelope with the digital signature activation codes to the requester, the RAO operator can search for the order in question from the side menu Search and Consultations > Active using the available filters:

Click on the UserID to view product details:

Open the General Information dropdown and in the lower left corner under Other Features click the appropriate Resend button:

At this point, AO operator again sets the passphrase (choosing whether to use the Social Security number or one of his or her choice) that the service owner will use to open the new encrypted envelope received via e-mail:

Clicking on Confirm displays an appropriate message of successful re-submission:

Product and Order Research
From the side menu Search in the drop-down menu below you can click on Search or on the different sections that automatically set a filter:
- To Identify
- To be issued
- Revoked
- Active
In all cases it is still possible to search using filters:
- Order ID
- User ID
- External lookup code
- Status
- Nickname
- Activation date
- Input date
- Tax ID code
- First and Surname
- Mobile phone
- Operator
The data shown in the slide does not correspond to real data; any resemblance is purely coincidental.

The search result is returned in the form of a table.
The values returned are Order ID (clickable), Applicant, Holder, UserID (clickable), status, product type and additional info.
Order Detail
After performing a search, the result is returned in the form of a table.
The values returned are Order ID (clickable), Applicant, Holder, UserID (clickable), status, product type, and additional info:

By clicking on the order ID, RAO lands on the page containing order details with general information, products, and customer data:

Order details are divided into:
- General information: activation code, request status, customer type, operator, contract status
- Products: userID, status, type, additional info
- Applicant: personal data, e-mail, mobile and address
Product detail
After performing a search, the result is returned in the form of a table.
The values returned are Order ID (clickable), Applicant, input date, UserID (clickable), state, recognition type, product type, IPP operator, and additional info:

By clicking on the UserID you can land on the page containing the product details, and in particular:
- The cronologia of the richiesta where the status of the request is indicated
- Activation code informazioni generali, product status, product type, activation/expiration dates, UserID, and billing expiration date
- And finally, in the last section the identity is specified
The requested history also contains the evidence collected by the operator and from here it is possible to download the contract and re-send it in case the subject has not received it by e-mail due to any spam filters.

