
 Guide to using the Wireless Key (MOBILE - DESKTOP)
Overview
The Wireless Key is an InfoCert Signature and Authentication device for digital signature on smartphones and tablets. It can also be used with GoSign Desktop via USB and on tablets and smartphones to sign any document with the innovative button that connects the device directly to the GoSign Mobile App via Bluetooth.
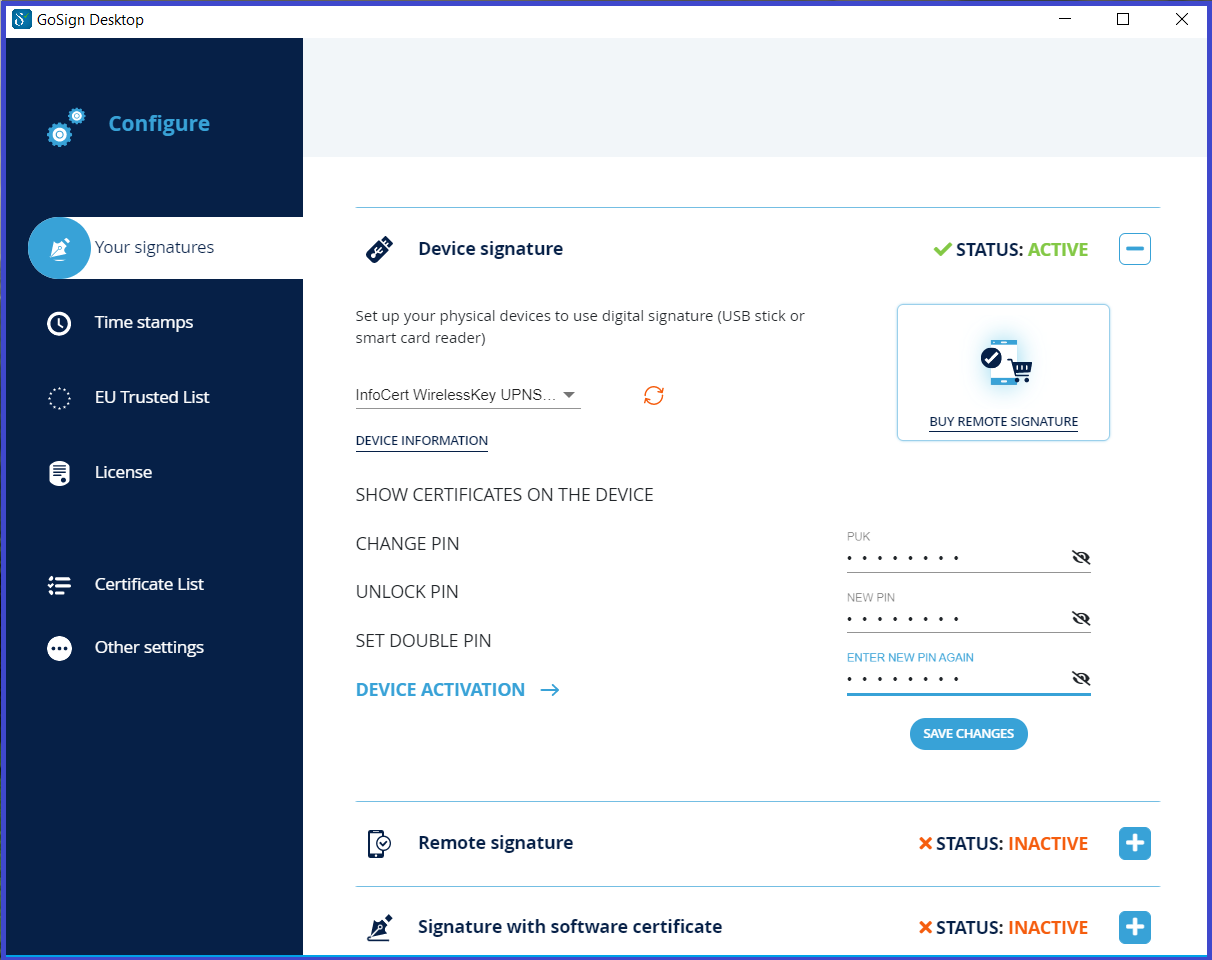
Before using the device, you need to activate it. You have to replace the PIN assigned with one of your choice and exclusive knowledge. The ASSIGNED PIN is the one contained in the folder or revocation envelope (also in virtual version) that was delivered at the time of release of the device. Using GoSign Desktop software you can replace this PIN with your personal one.
To successfully activate with GoSign Desktop, you have to physically connect the Wireless Key to your workstation via USB.
Then you have to start the GoSign Desktop software and open the Configure menu (marked with the gear icon), then you select the page dedicated Your Signatures and open the Device Signature section, below Device Activation.
After you have recovered the codes contained in the folder or revocation envelope, enter the PIN or PUK indicated (they are identical, so the choice is irrelevant) and choose the new PIN, remembering that it must consist of 8 characters all numeric. Re-enter the new PIN and proceed with a click on the Confirm button.
GoSign Desktop will confirm that I have activated my device.
P7M Signature of a document with Wireless Key
Once the Wireless Key is activated, you can sign my first document.
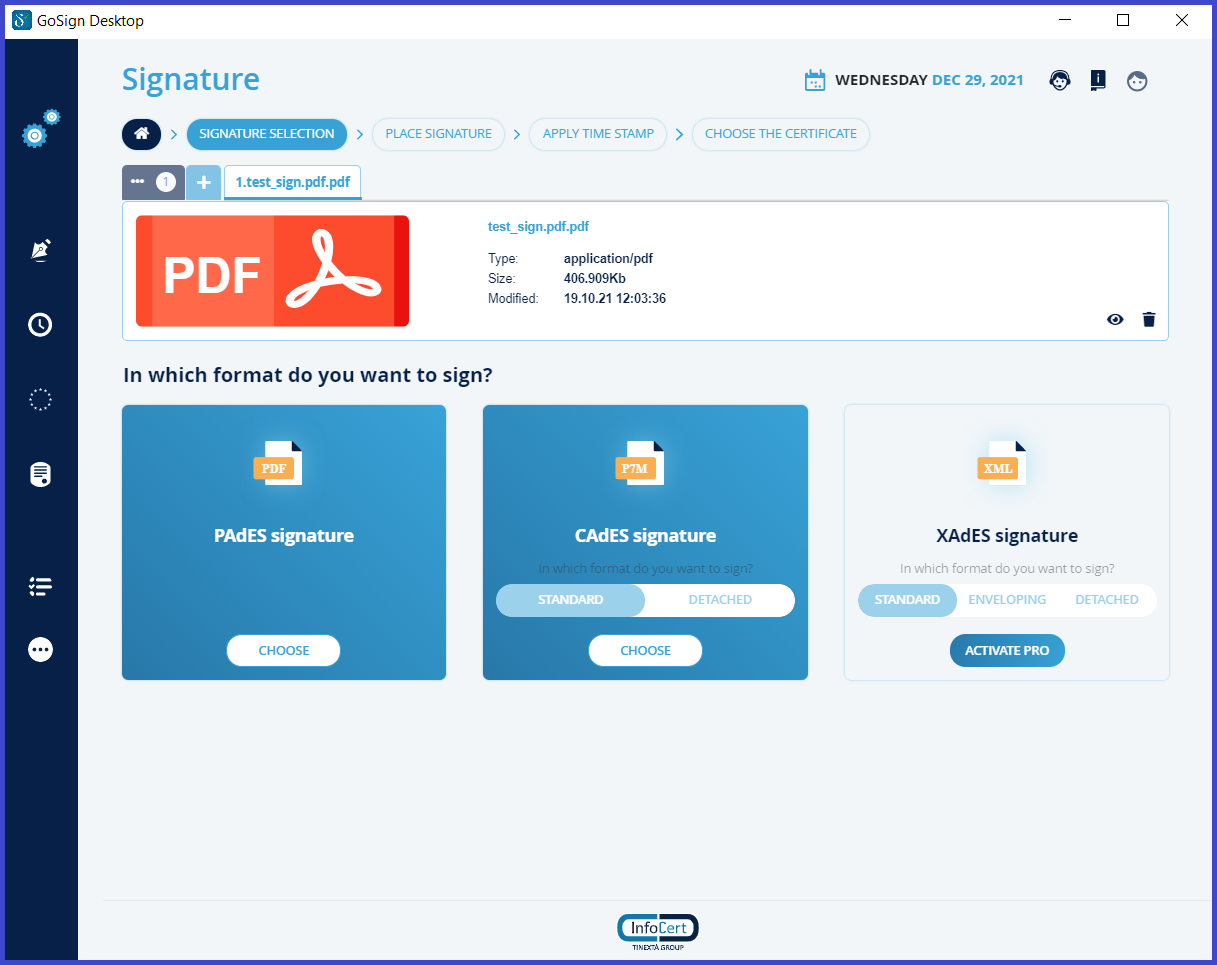
Obviously, as with the other ways of signing with certificates, you have the possibility to choose the signing format, a P7M or a PDF signature.
At the bottom of the screen you can see the technologies which you can sign documents. To produce a document with the extension .p7m, you will have to choose the CAdES technology and you can proceed with a click on the Choose button under the CAdES Signature.
Once you have chosen the signature format, the Signature process propose the choice to apply a timestamp to the document. This timestamp will be in CADES-T format.
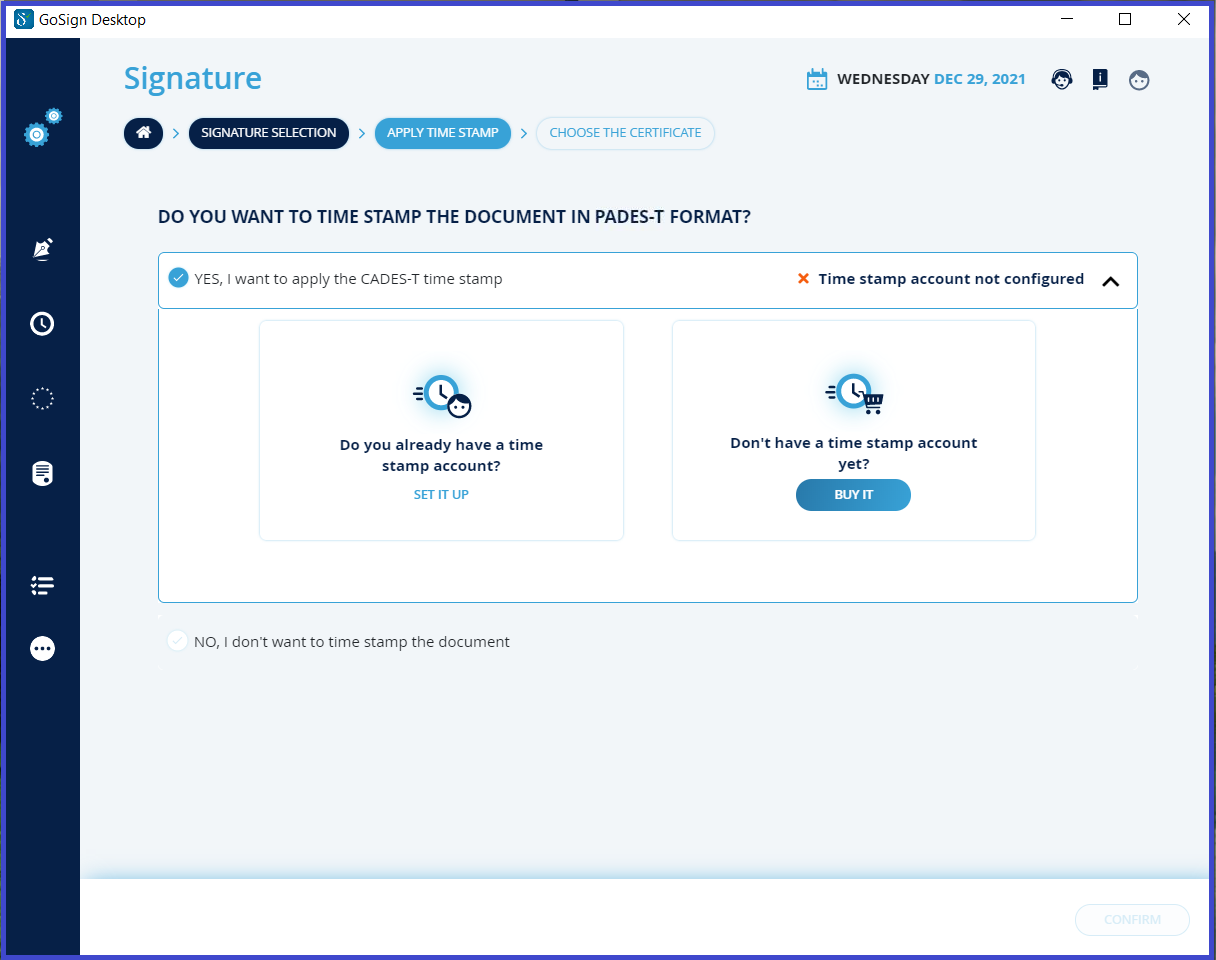
For the application of the timestamp, it is necessary that an account containing the timestamps is configured, if you have not already configure it by clicking on configure your account, the Configure side menu will be open in the timestamp section.
Once you have chosen if you want or not apply a timestamp, you have to press the Continue button to proceed to the next step.
After selecting the device signing certificate option (in this case via Wireless Key) you can proceed with the signing of the document.
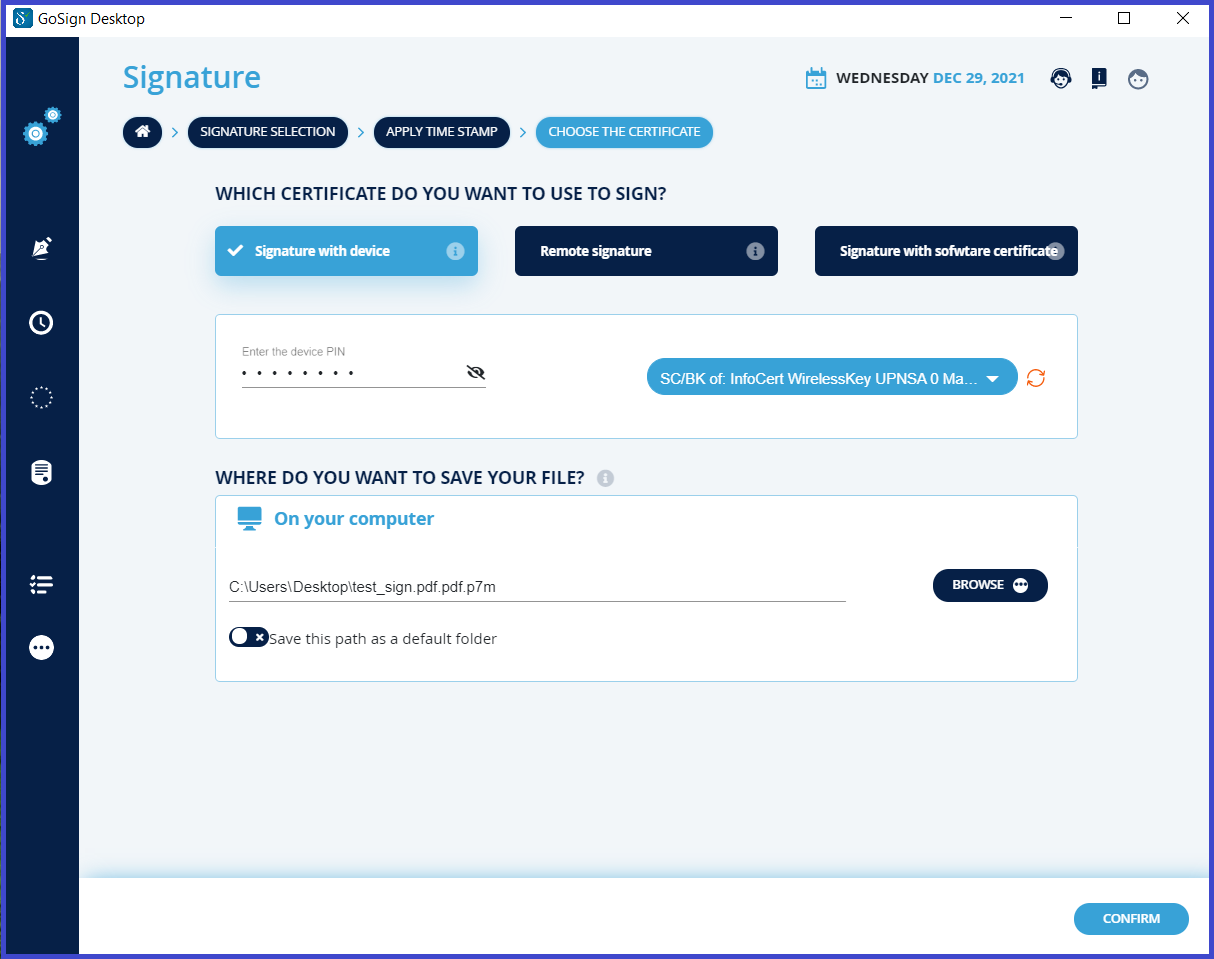
You have to put the protection PIN of the physical device in the Enter the device PIN field and you have to select the device through the drop-down menu. If no device is detected by clicking on the refresh icon, a signature device connected to the PC will be searched again and in case of a positive result the name will be displayed in the menu.
GoSign Desktop proposes a possible path in the Save Destination field, which coincides with the overwriting of the original file that will be replaced by the signed document.
If you choose to overwrite the original document, you will confirm the operation.
Otherwise, through the Browse button, it will be possible to change the destination of the signed document with the possibility of renaming it.
Once you have chosen the destination of the document by clicking on the OK button, the process of document's overwriting will be concluded.
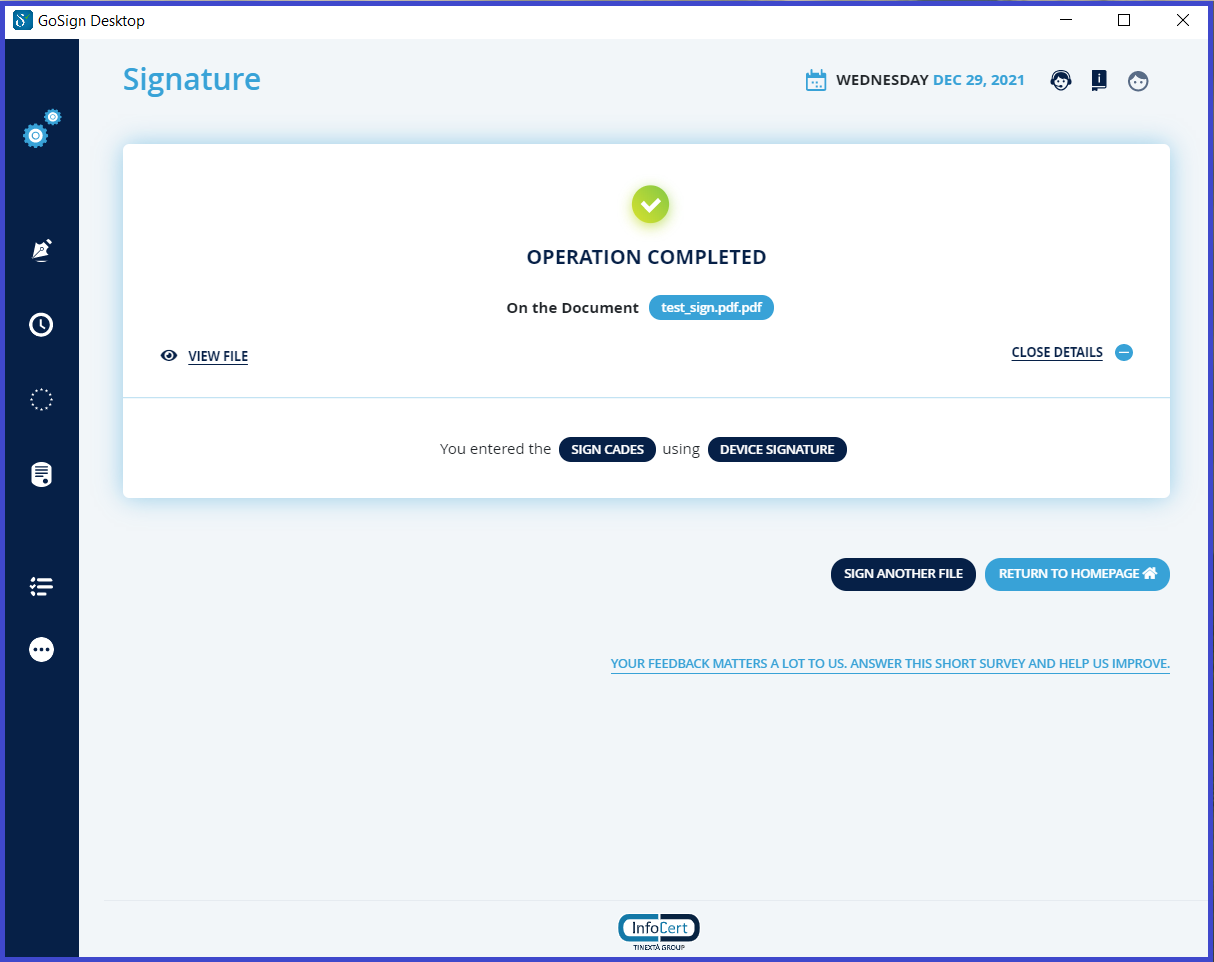
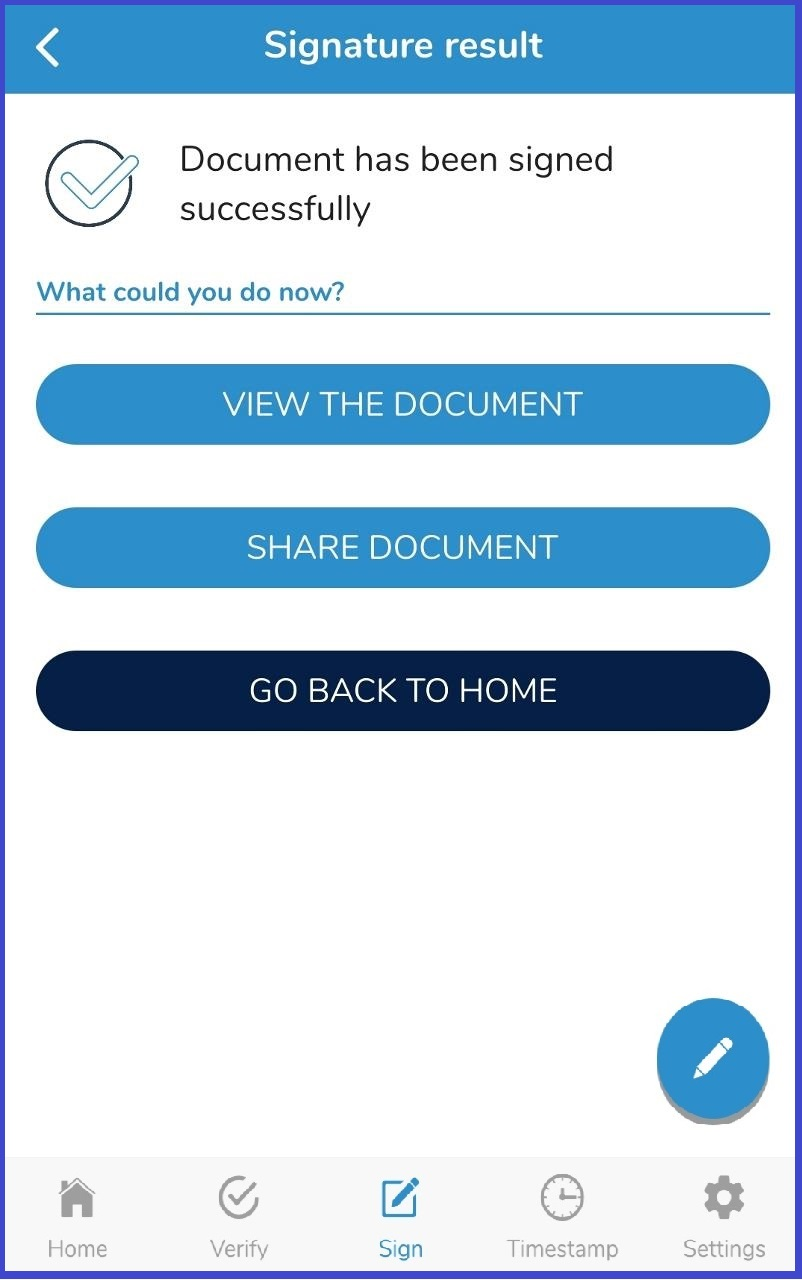
GoSign Desktop will confirm the signature, in the last screen of the process of the Signature function you can know if the signing process has been successful or not. You can view the signature's type and which certificate was used. If it is necessary, through the view file's function, the signed document will be open.

GoSign Desktop now allows to either directly sign a new document returning on the first screen of the Signature function, inviting to choose a new document, or return to the Homepage.
PDF signature of a document with the Wireless Key
GoSign Desktop with the Signature option on the home page, allows to select the document to be signed and to recall it within the software.
GoSign Desktop presents the details of the document (type, size, etc.) and show the Open document button (indicated by the eye icon) to display it and the Delete function (indicated by the trash icon) to delete the document.
At the bottom of the screen you can see the technologies which you can sign documents. To produce a document with the extension .pdf, you will have to choose the PAdES technology and you can proceed with a click on the Choose button under the PADeS Signature.
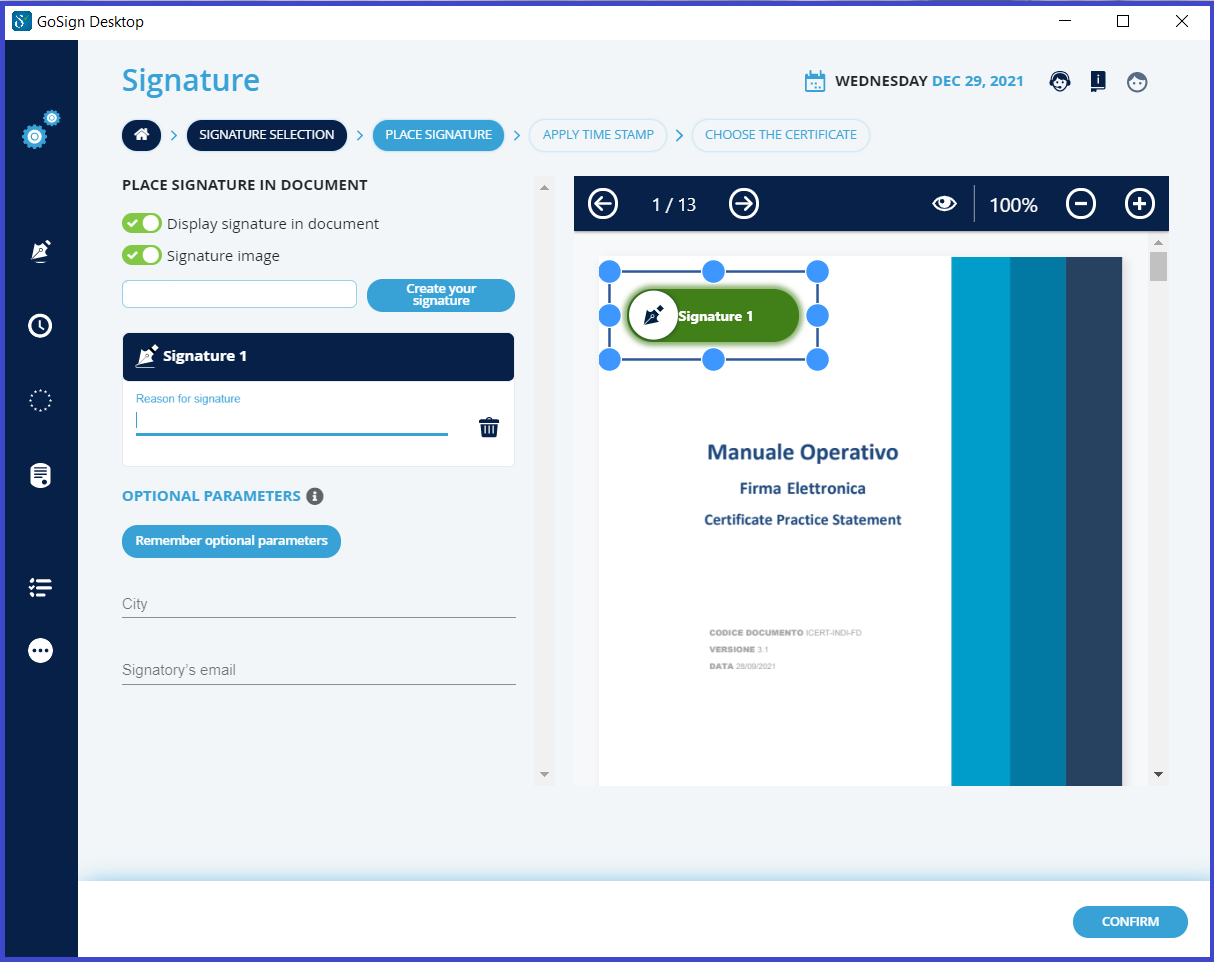
The Signature process continues with the possibility of making the signature visible on the document. This is possible by activating the DISPLAY SIGNATURE IN DOCUMENT checkbox. It's very important to keep in mind that this graphic sign has no legal value and **IS NOT ** in any way your digital signature.
In the box the signature image will be displayed, by default it's the image uploaded in the _ Configure _ section in the _ your signatures _ section.
It will be possible to add additional information:
You can also add more signature boxes, with a double click on the pdf preview, if you want to change the signature image just click on the CHOOSE ... button in the signature box and if you want to remove a signature, just click trash icon.
By activating this option, it will be mandatory to apply the signature in the document by double clicking on the preview of the document, otherwise it will not be possible to continue the Signature process.
The application of timestamps, proceed as documents that are signed in ** CAdES ** technology.
Once you have chosen whether you want a timestamp or not, press the Continue button to proceed to the next step.
After selecting the device signature certificate option (in this case via Wireless Key) you can proceed with signing the document.

The protection PIN of the physical device must be entered in the field Enter the device PIN and that must be selected through the drop-down menu of the device.
If no device is detected by clicking on the refresh icon, a signature device connected to the PC will be searched again and in case of a positive result the name will be displayed in the menu. By default, GoSign Desktop proposes as a possible path in the Save Destination field, which coincides with the overwriting of the original file thus being replaced by the signed document.
If you choose to overwrite the original document, you will be prompted to confirm the operation.
Otherwise through the Browse... button it will be possible to change the destination of the signed document with the possibility of renaming it.
Once you have chosen the destination of the document by clicking on the OK button, the process of overwriting the document will be concluded.
GoSign Desktop will confirm the signature, in the last screen of the process of the Signature function you can know whether or not the signing process has been successful. You can view the type of signature and which certificate was used. If it is necessary, the view file function opens the signed document.
GoSign Desktop now allows to either directly sign a new document returning on the first screen of the Signature function, inviting to choose a new document, or return to the Homepage.
To connect the Wireless Key device, make sure that the Bluetooth connection option is turned on. In this case the connection symbol will be dark gray, otherwise it will be gray and if you try to select it you will receive an error message.

Once the bluetooth has been activated, it is necessary to put the Wireless Key in pairing mode, ready to be recognized and combined with the mobile phone (or tablet).
First of all, start the Wireless Key by holding down the button for 2 seconds. The Wireless Key is in on mode and is confirmed by the flashing blue color assumed by the bright display.

After that, you have to hold down the button for another 2 seconds: the Wireless Key enters in pairing mode and is confirmed for the flashing blue color, alternating with pink, assumed by the bright display.

Once you have finished this operation, the Wireless Key is ready to pair with the app.
Select again the Bluetooth connection icon with a tap on the screen of the mobile phone. It will detect the device and provide to you the name of the Wireless Key, consisting of a sequence of 5 characters.
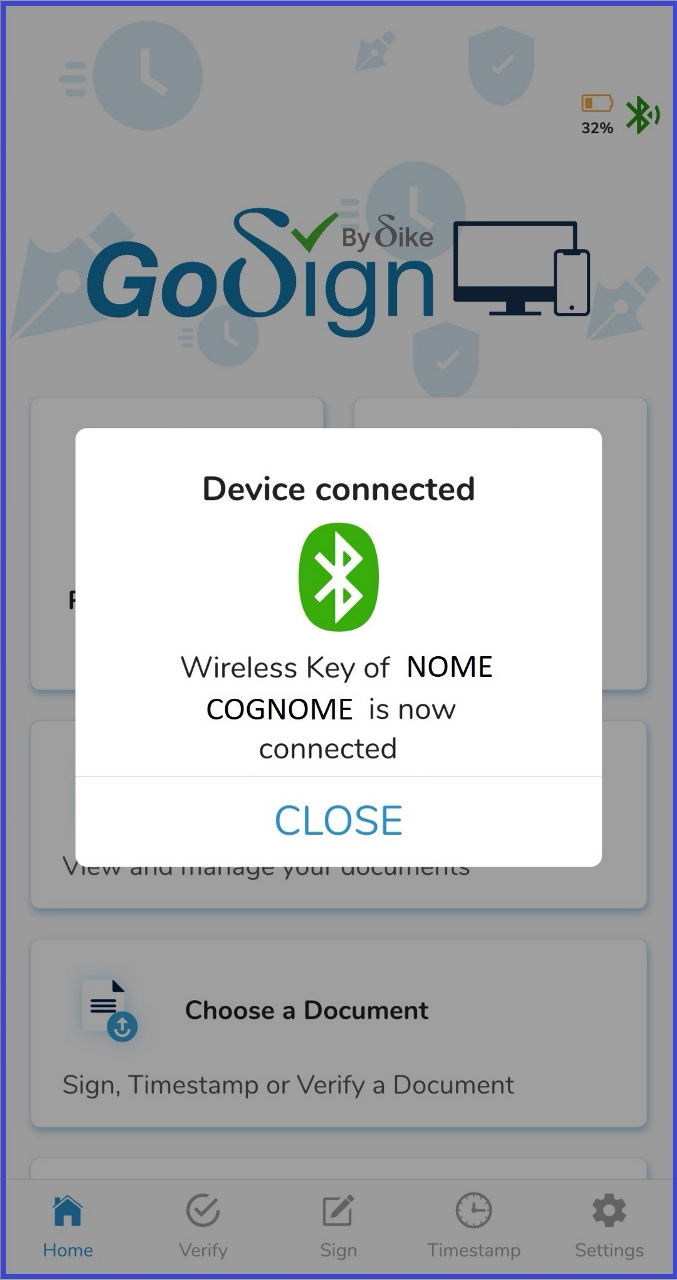
A little pressure on the name of the Wireless Key allows the pairing.

GoSign Mobile confirms that the pairing process has ended and a message will indicate the name and surname of the device's owner.
After pairing, the Bluetooth icon is green and remains as long as the Wireless Key is connected to the phone (or tablet).
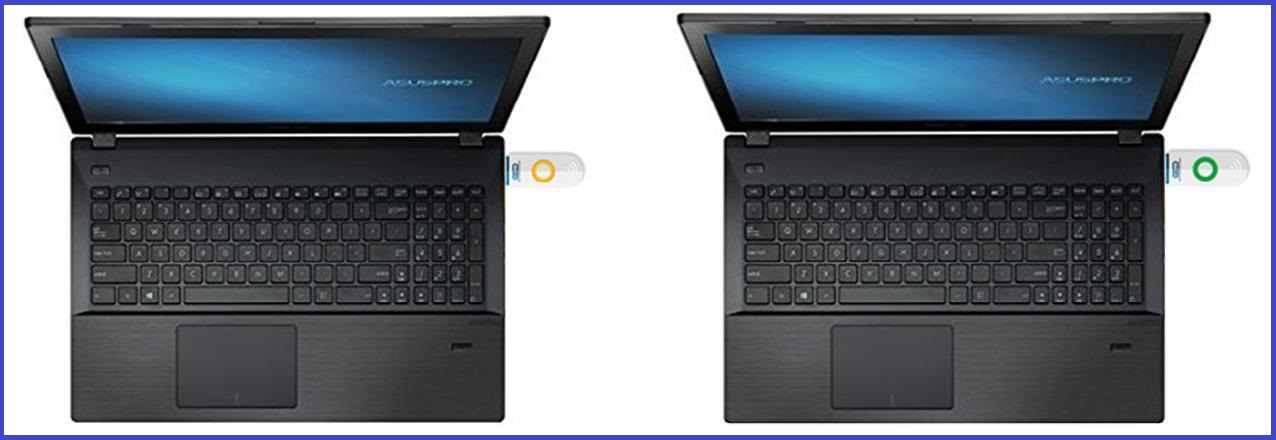
Next to the Bluetooth icon, you will find the icon of a battery that indicates the status of the battery of the Wireless Key, also specifying the level in percentage. From 100% charge and up to 30% the battery icon is blue.
From 30% charge and up to 10% the battery icon is yellow (although the bright display of the Wireless Key is still flashing blue).
This means that the battery is in reserve: it is possible to conclude the signing or navigation operations on a portal of the Public Administration but you must connect the Wireless Key to the computer to allow it to be recharged.

After launching GoSign Mobile on your smartphone and verifying that the Wireless Key is hooked to the App, choose the Signature option available in the navigation bar at the bottom of the screen and select the document to sign.
Alternatively, you can select the document to be signed starting from the GoSign Documents or Choose a document.

In this second case, the App proposes the details of the document (type, size, etc.), and the list of possible actions available for signature.
Proceed with the selection of the option Sign the document.

In the signature control panel, you will find the function that allows you to select the signature device that you will use to sign the document and you will have to set Wireless Key.
You can also choose the type of signature, P7M or PDF. If you need to sign a document with a .doc extension, .xls or others, you will choose the signature in P7M mode; if you need to sign a document with an extension .pdf you will choose both types of signature, P7M or PDF.
Obviously, it is also possible to insert a time stamp.
To sign you will proceed with a tap on the blue signature icon.

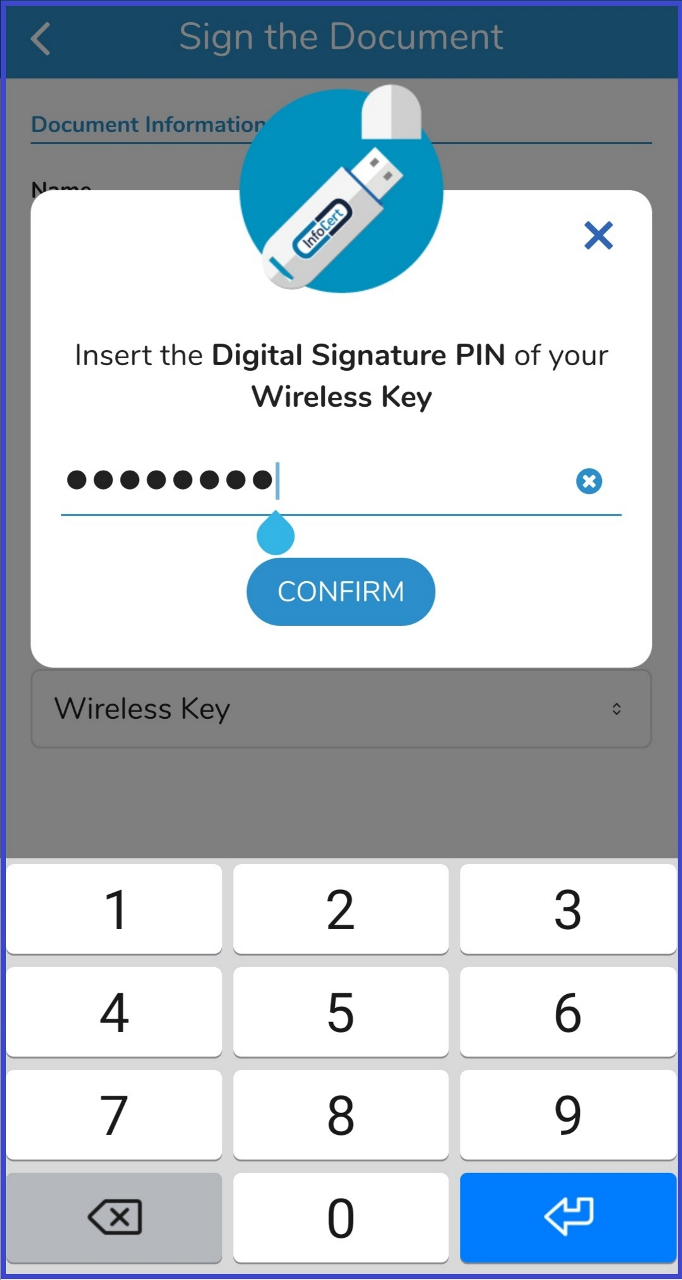
At this point you need to enter the PIN protection of the Wireless Key in the Insert the Digital Signature PIN of your Wireless Key field and continue with a tap on the Confirm button.
At the end of the signing operation you will receive a confirmation message. Digitally signed documents and those digitally signed and time-stamped are saved within the Signed area in the GoSign Documents.
The operation of the Wireless Key is guaranteed by the presence of a battery, which conditions its use. This means that to use the Wireless Key in the best way you you have to check the status of the battery and charge it.
The estimated battery life is about 14 days, after which it discharges completely. At this point, to recharge the battery you will need to connect the Wireless Key to a USB on the computer.
The charging time – from fully discharged to fully charged – is 3-4 hours.
To check at a glance the battery level, simply keep under control the battery icon that appears on the screen of the mobile phone and the bright display of the Wireless Key.
If the Wireless Key is not hooked to the mobile, and the battery ranges from 100% charge up to 30%, the battery icon will not be visible but the device display will be blue.
If the Wireless Key is hooked to the mobile phone and the battery ranges from 100% charge up to 30%, the icon will be blue and the display will be green.

From 30% charge up to 10% the battery icon is yellow (although the bright display of the Wireless Key is still flashing blue).
This means that the battery is in reserve: it is possible to conclude the signing or navigation operations on a portal of the Public Administration but you have to connect the Wireless Key to the computer to allow it to be recharged.

Once you connect the Wireless key to the computer, the bright display of the device takes on a flashing yellow color. When charging is complete, the bright display of the Wireless Key, still connected to the computer, takes on a flashing green color. Once removed, the display will return to be flashing blue. It's time to use it and pair it again with your mobile phone to sign documents or browse safely on the portals of the Public Administration.
Below 10% charge the battery icon is red and the bright display of the Wireless Key takes on a flashing red color.
The battery of the Wireless Key is low: you have to connect the Wireless Key to the computer to allow it to be recharged also because the process of pairing with the mobile phone or even the signing of the document may not be managed correctly.

If you used the Wireless Key to sign documents with GoSign Desktop, after closing the software, use the safe removal procedure of the USB device.
If you have used the Wireless Key to sign documents with GoSign Mobile, simply close the App.

