 GoSign Guide (MOBILE)
Installation
GoSign Mobile allows you to digitally sign and time-mark electronic documents using your smartphone and the signing certificate, which can be on a remote device or on a Wireless Key.
If you use a device with iOS operating system, to download the App GoSign Mobile you have to go to the Apple Store, searching GoSign Mobile, once you find the application press on the Get button.

If you use a device with Android operating system, to download the App GoSign Mobile you have to go to the Play Store, searching GoSign Mobile, once you find the application press on the Install button.

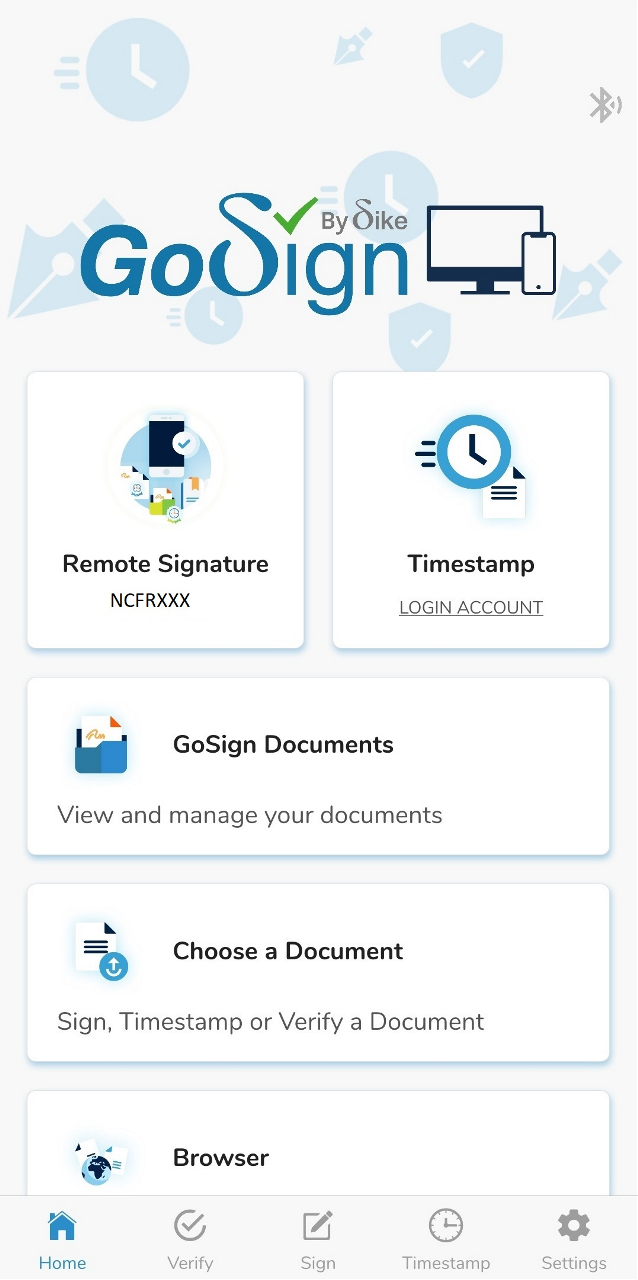
To configure a Remote Signature account there are two options: from the home page, by clicking on the Login button, alternatively you can use the Settings function (marked by the gear icon at the bottom right of the screen in the navigation bar).

To configure the remote signing certificate, GoSign Mobile you have to fill in:
the User ID of access to the service (the one that was assigned by InfoCert at the time of registration, can be found on the copy of the Registration Request delivered to the user or in the email received immediately after with the certificate activating instruction;
the Password (the one used to access the portal dedicated to the holders of a remote certificate, My.Sign, that was customized at the time of certificate activation.

GoSign Mobile asks you to confirm the operation by typing the OTP code that will arrive with an SMS message.

The sender of the SMS message is InfoCert, Digital Remote Sign; the text of the message indicates the date of the request, the time of generation of the OTP Code and the code OTP that must be reported in the available field, taking care to type it correctly. Continue with a click on the OK button.
You will receive confirmation that the app have been correctly configured.

To configure the Timestamp account there are two options: from the home page, by clicking on the LOGIN ACCOUNT button in the Timestamp section or alternatively you can use the Settings function (marked by the gear icon at the bottom right of the screen in the navigation bar).
To log in, you have to use the credentials to access the service or those for accessing the [InfoCert Store] (https://ecommerce.infocert.it/). After providing the credentials, to continue with the activation you have to click on the Login button.

You will now receive confirmation that the timestamp service has been successfully connected to GoSign Mobile. When you enter your login credentials, GoSign Mobile offers the option to stamp documents at the same time as the signature, updating the number of timestamps you have available.

Wireless Key
To connect the Wireless Key signing device, make sure that the Bluetooth connection option is turned on. In this case the connection symbol will be dark gray, otherwise it will be gray and if you try to select it it will return an error message.

Once bluetooth is activated, it is necessary to put the Wireless Key in pairing mode, meaning ready to be recognized and paired with the mobile phone (or tablet).
First, start the Wireless Key by holding down the button for 2 seconds. The Wireless Key is in on mode and is confirmed by the flashing blue color on the bright display.

Immediately after, you have to hold down the button for another 2 seconds: the Wireless Key enters pairing mode and is confirmed for the flashing blue color, alternating with pink, on the bright display.

Once this operation is completed, the Wireless Key is ready to be paired with the App.
Select again the icon of the Bluetooth connection with a tap on the screen of the device that will detect the device and provide in response the system name of the Wireless Key consisting of 5 characters.
A little pressure on the name of the Wireless Key advances the pairing.

GoSign Mobile provides confirmation that the pairing process has ended, and at this point the message will indicate the name and surname of the user as the owner of the device.

After pairing, the Bluetooth icon takes on a green color and remains this color as long as the Wireless Key is connected to the phone (or tablet).
Next to the Bluetooth icon there is a battery icon that indicates the battery status of the Wireless Key, also specifying its level as a percentage. From 100% charge and up to 30% the battery icon is blue.
From 30% charge and up to 10% the battery icon is yellow (although the bright display of the Wireless Key is still flashing blue).
This means that the battery is in reserve: it is possible to conclude the signing or navigation operations on a portal of the Public Administration but you must connect the Wireless Key to the computer to be recharged.
Therefore, the check of the battery status of the Wireless Key must be done often in order to work in the best way and if necessary, recharge it.
If the Wireless Key is not connected to the mobile, and the battery ranges from 100% charge up to 30%, the battery icon will not be visible while the display of the device will be blue.
If, on the other hand, the Wireless Key is connected to the mobile phone and the battery ranges from 100% charge up to 30%, the icon will be blue while the display will be green.

Once connected to the computer, the bright display of the Wireless Key also takes on a flashing yellow color. When charging is complete, the bright display of the Wireless Key, still connected to the computer, takes on a flashing green color. Once removed the display will return to be flashing blue. It's time to retrieve it and pair it again with your mobile phone to sign documents or browse safely on the portals of the Public Administration

Below 10% charge the battery icon is red and the bright display of the Wireless Key also takes on a flashing red color.
The battery of the Wireless Key is low: you have to connect the Wireless Key to the computer to recharge it also because the process of pairing with the mobile phone or even the signing of the document may not be managed correctly.

The estimated battery life is about 14 days, after which it discharges completely. At this point, to recharge the battery you will need to connect the Wireless Key to a USB port on the computer.
The charging time – from fully discharged to fully charged – is 3-4 hours.
To disconnect the Wireless Key just put it in off mode by holding down the button for 4 seconds and verifying that the bright display is off.
You can release your remote signature certificate or timestamp login credentials from the GoSign Mobile App at any time. If necessary, use the Settings function, marked with the gear icon at the bottom right of the screen.
Simply select the service to disable and, once inside, press on the blue "X" to receive a request to remove the account and continue with a click on the YES button.

The signature function is placed at the bottom of the navigation bar, while in the middle part of the screen other documents management features are displayed.
You can add documents to be digitally signed in GoSign Mobile Documents folders or Choose a document.
In the first section you will find folders containing the documents that have already been uploaded in GoSign Mobile app.

The second option will open the list of folders and documents available in your mobile phone.

Once the document is selected, it will be added to the GoSign Mobile Added folder. This is the recommended mode to share mobile documents with the GoSign Mobile App and if your device works with a iOS operating system, it will be the only procedure allowed.
Alternatively, you can select the document after choosing the Signature function with a click on the corresponding icon available in the navigation bar at the bottom of the screen. Once you have identified the path to get to the folder where the documents are saved (searched among those available in the app or saved on the mobile phone), you can search and select the document you need.
Once you have chosen the document you want to sign, the details of the document (name, size, last modified) are displayed.
GoSign Mobile allows you to choose between two types of signature: CAdES, which returns signed documents in .p7m format and allows you to sign any type of document and PAdES and can be chosen if it is a document in .pdf format and returns a signed document in .pdf format.
To sign a document with a remote signing certificate, you have to set the SIGN option to Remote Signature.

Next step is enter the security PIN of the remote signing certificate in the field Insert your Digital Signature PIN.
If you have already configured the OTP code generator, you will find the eight digits that compose it already showed.
Otherwise you will receive an SMS message on your mobile phone and you will to report the digits received in the dedicated field. Click on OK button to continue.

When the signing operation is complete, you receive a confirmation message.

Digitally signed documents and digitally signed and time-stamped documents are saved in the GoSign Mobile Documents folder, "signed" section,
To sign a document with a Device (Wireless Key) you have to verify:

In addition, if you have connected GoSign Mobile to the timestamp service, at the time of signing you have the option to add a timestamp by selecting the option Insert timestamps.
Next step is enter the security PIN of my certificate in the field Insert your Digital Signature PIN and continue with a click on the Confirm button.
When the signing operation is complete, you receive a confirmation message.
Digitally signed documents and those digitally signed and time-stamped are saved in the GoSign Mobile Documents folder, Signed section.

In the screen where the outcome of the signing operation is shown, you can share the document by clicking on SHARE DOCUMENT. You can choose one of possible sharing options showed and press on CONFIRM.
The verification of a digitally signed and/or marked document is just as important as the signing and timestamping activity.
GoSign Mobile provides the Verify function in the navigation bar at the bottom of the screen. With a click on the icon and you can select the signed and/or marked document to verify
You can add digitally signed documents to GoSign Documents or Choose a Document. In the first you will find folders and, within these, the documents already uploaded in the GoSign Mobile App.

With the second option you will find the list of folders and documents available within your mobile phone.

Once the document is selected, it will be added to the Added folder of GoSign Mobile. This is the recommended procedure to share mobile documents with the GoSign Mobile App and if your device works with a iOS operating system, it will be the only procedure allowed.
Alternatively, you can select the document after choosing the Signature function with a click on the corresponding icon available in the navigation bar at the bottom of the screen. Once you have identified the path to get to the folder where the documents are saved (searched among those available to the App or saved on the mobile phone), you can search and select the document you need.
Once you have chosen the document to verify, GoSign Mobile's response is direct and consists of presenting the signature and signer information. A click on the gray cockade icon will provide detailed information about the certificate used to sign.
The verification report is a pdf document that shows the outcome of the verification carried out on the document. The report can be obtained by clicking on the document icon, the report will be generated and it will be possible to view it through the application preset by the device that will allows you to open a PDF document by clicking on VIEW REPORT.

The verification report can be shared as a file .pdf via email, chat, or any other document sharing application on your device. To carry out the sharing operation you have to click on the SHARE REPORT button, the list of possible sharing options will open and just choose one of them and press on CONFIRM.

If you need to prove – or validate – the existence of a document at a certain date, you can do by using time stamping.
You can select the document to be time-stamped starting from the folders Gosign Mobile Documents and Upload a document folders or by clicking on the Time stamping function icon available in the navigation bar at the bottom of the screen.
Proceed by selecting the option Apply Time Stamp. The timestamp can be affixed both to documents already signed and to documents not signed.
You can add digitally signed documents to GoSign Mobile Documents folders or Choose a Document.
In the first you will find folders and, within these, the documents that have already been uloaded in the GoSign Mobile App.

With the second option find the list of folders and documents available within your mobile phone.

Once the document is selected, it will be added to the gosign Mobile Added folder. This is the recommended procedure to share mobile phone documents with the GoSign Mobile App and if your device works with an operating system iOS, it will be the only procedure allowed.
Alternatively, you can select the document after choosing the Signature function with a click on the corresponding icon available in the navigation bar at the bottom of the screen. Once you have identified the path to get to the folder where the documents are saved (searched among those available to the App or saved on the mobile phone), you can search and select the document you need.
GoSign Mobile allows you to get:

Once you have identified the type of timestamp that you need to affix to the document, you can select the corresponding option continue with a click on the blue brand icon. At the end of the operation, GoSign Mobile will confirm the success of the operation.

Time-stamped documents are saved within the Time stamped area within the GoSign Mobile Documents folder.
In the screen where the outcome of the stamping operation is shown, you can share the time stamped document by clicking on SHARE DOCUMENT the list of possible sharing options will open and you can choose one of them and press on CONFIRM.

